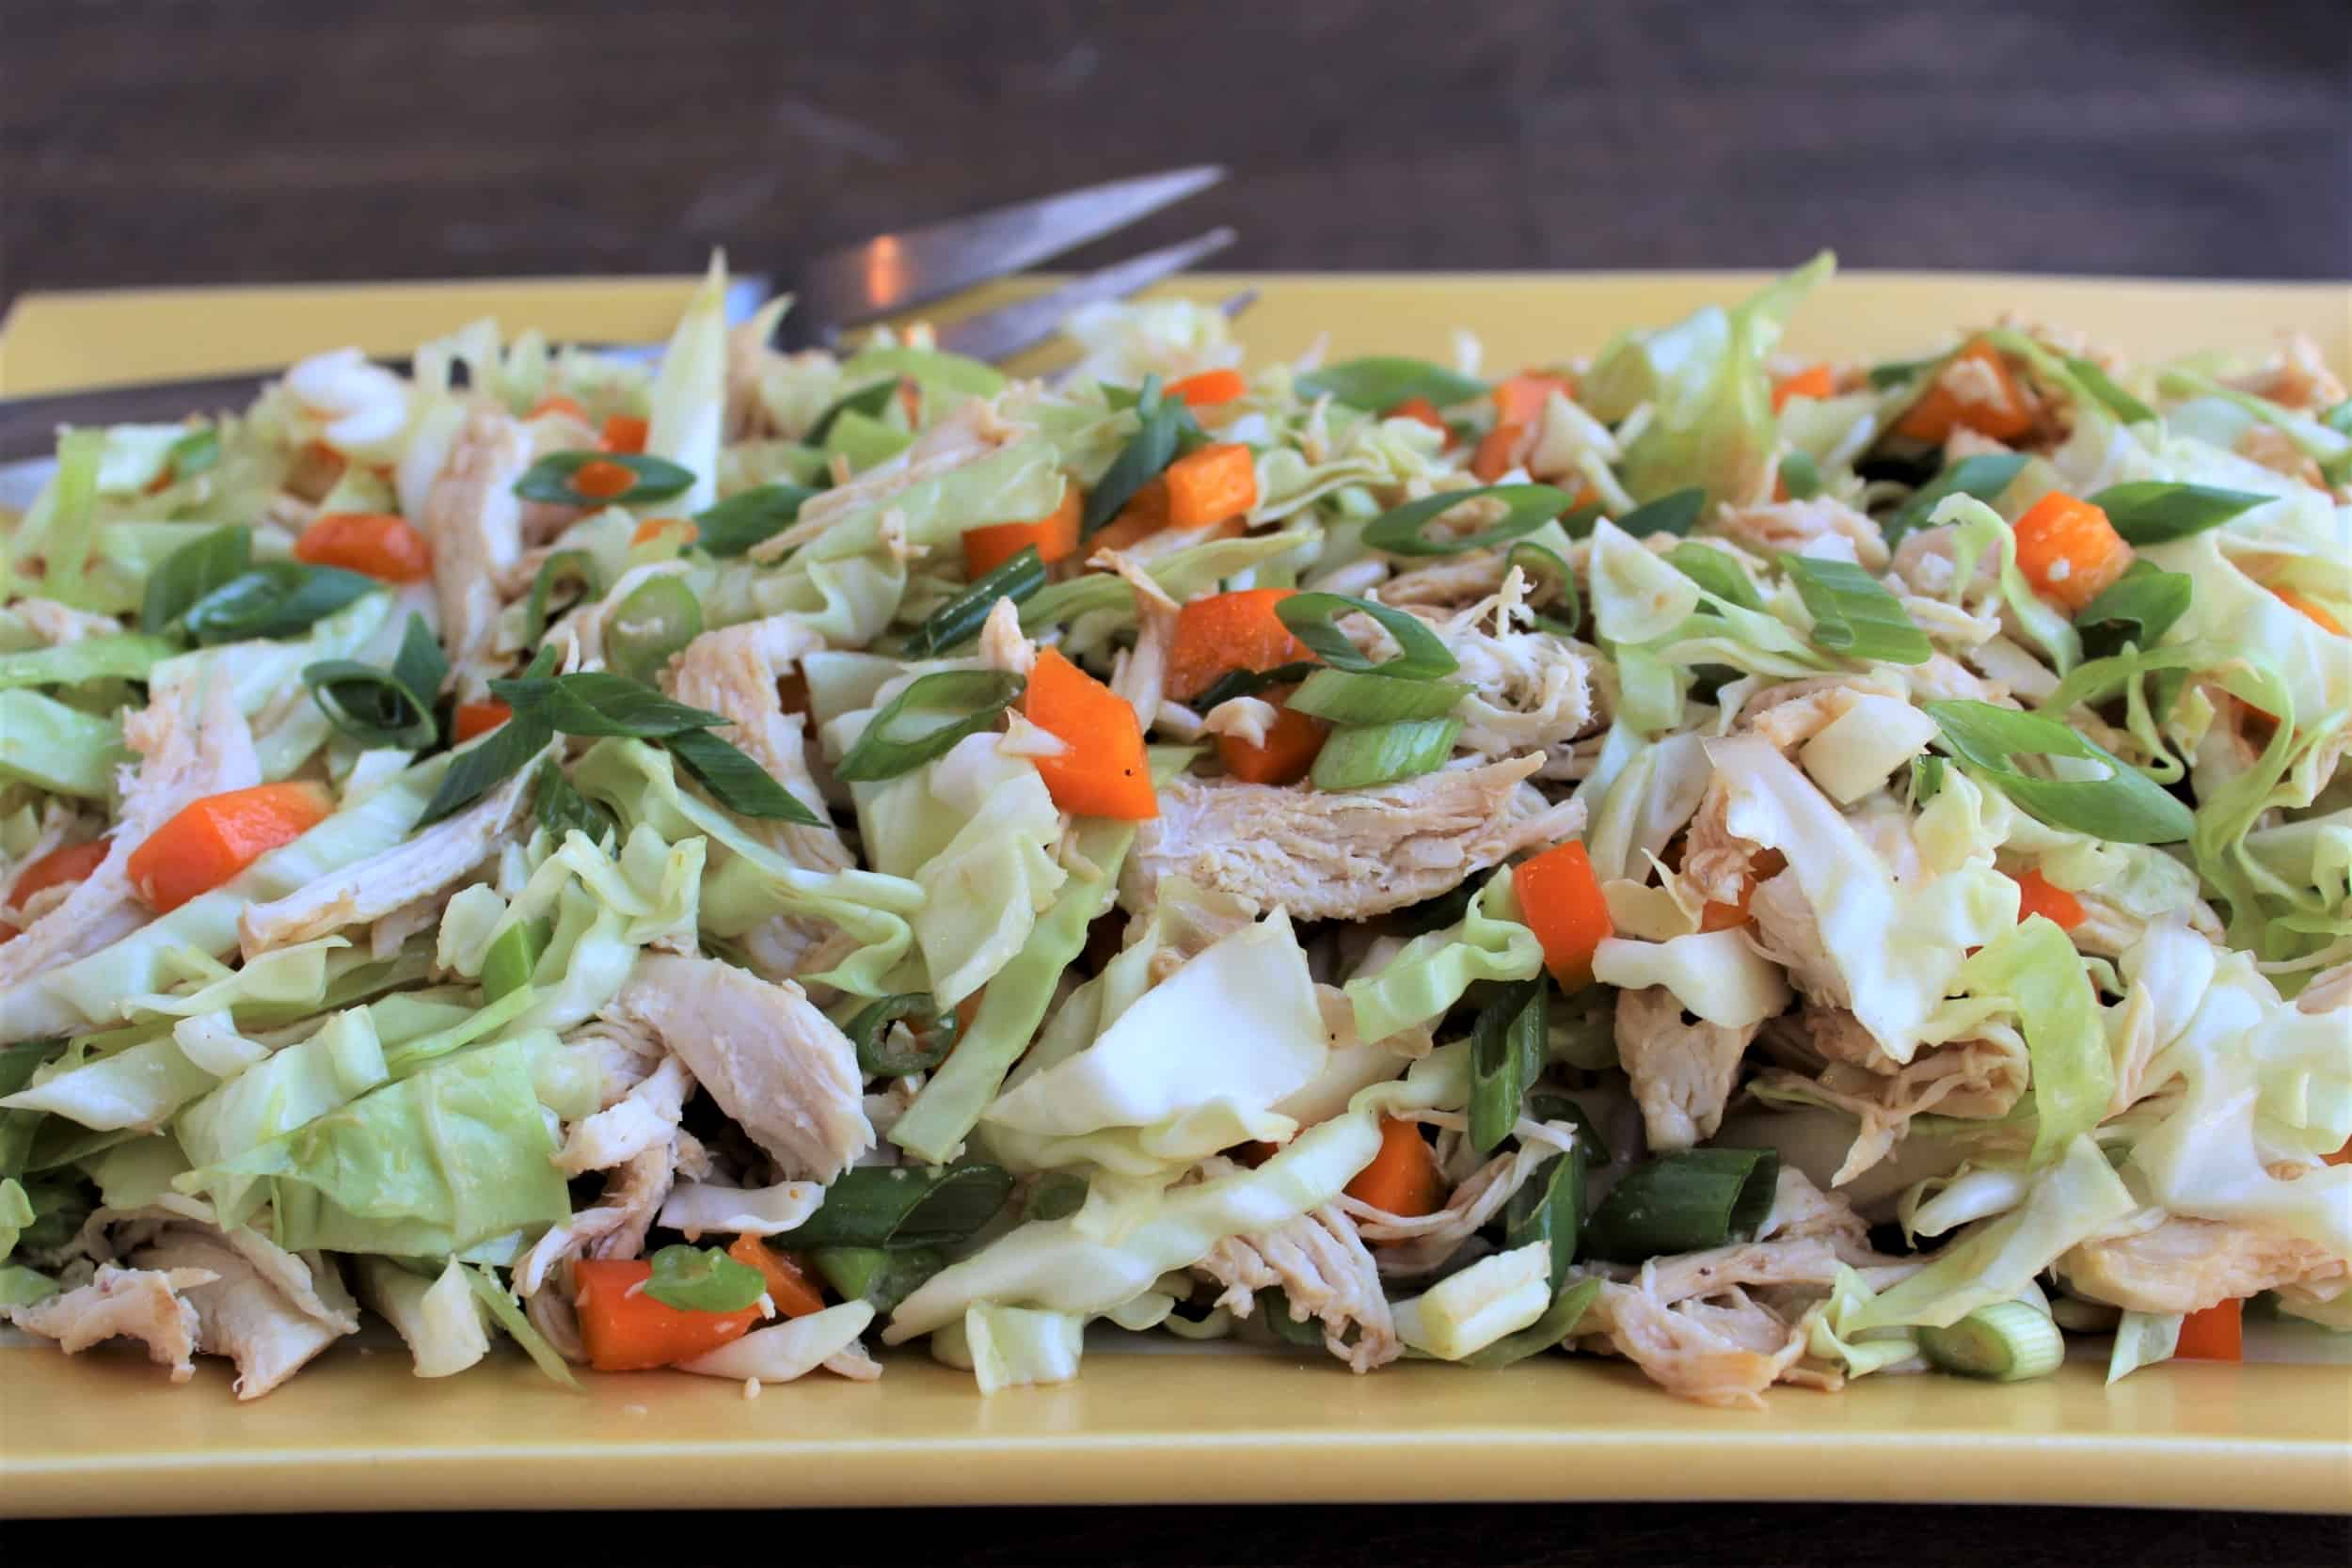
Memorial Day Weekend…When Summer Really Starts!

I seriously love everything about May.  I love the way May smells (cut grass and lilacs!); I love the incessant chattering of birds at 4:45 a.m. (no, really, I do!); I love the long, sunny days; and I especially love Memorial Day Weekend.  It is the unofficial gateway to summer! Are you ready?!?

I’m ready. Well, almost ready. We’ve got a weekend full of baseball and soccer to look forward to, and a huge cookout we’re hosting on Monday. This has become a kind of tradition for us. The Memorial Day parade rolls right by our driveway…

Friends and family come and watch with us, then meander down the driveway and hang out for a few (or several) hours eating, talking, and laughing.  And swimming — with any luck. A newer tradition has been to wait until the LAST POSSIBLE MOMENT to fix whatever is wrong with the pool water. It’s green, green, green. We’re working on it! And we’re surrounded by optimists who insist there is every reason to believe it will be ready by Monday.

In addition to hanging with family and friends, I’m looking forward to appearances from some annual food favorites this Monday, like my Super Fast Turkey Chili and Strawberry Glace Pie. Both are fantastic crowd-pleasers, as are some of the morsels below. Take a look at these babies!

Enjoy your long weekend! How are YOU celebrating the unofficial start of Summer??

Cinnamon Sugar Popcorn: A Whole Grain Snack!

I’ve already shared my family’s obsessive love of cinnamon. I can’t believe it took me this long to give one of our favorite crunchy snacks the ol’ cinnamon treatment! The kids were looking for something “good” to eat after school, and so we decided to give this a try. So glad we did! I am munching on the last of it right now (in a hurry, before the kids get home from school!)

I am predicting many other variations of popcorn in our future. This was easy to make, and certainly healthier than any bagged popcorn you might buy. A note about preparation: we pop our corn kernels the old-fashioned way, in a heavy saucepan with just a little oil.  You can decrease the fat content more if you air-pop the kernels instead. Made my way, there is still only around 6 grams of fat per cup – not bad considering you’re also getting a decent amount of fiber and protein, in addition to the sweetness that keeps them happy :)

If you happen to have any leftover (chuckle), it’ll keep for several days in an airtight container or ziploc-type bag.

Cinnamon Sugar Popcorn
adapted from Taste of Home
Makes ~ 12 cups

3/4 cup popcorn kernels
3 tablespoons canola oil
3 tablespoons butter
1/4 cup sugar
1 tablespoon water
1 teaspoon ground cinnamon
1/4 teaspoon salt

Preheat oven to 300 degrees F

In a large, heavy saucepan or soup pot (nonstick is best), heat oil over medium heat. Add corn kernels and cover the pan almost fully, leaving just a small opening to allow steam to escape. The kernels will begin to pop slowly at first, then pop rapidly for a minute or more. Once the popping has slowed to only one pop every few seconds, remove from heat. Pour popcorn into a large mixing bowl.

In a small saucepan, melt the butter over low heat. Add sugar, water, cinnamon, and salt, and stir until the sugar is dissolved. Pour the mixture all over the popcorn, then use a spatula to gently combine, scraping down the sides and folding the popcorn over and over until the pieces all are coated. Transfer the popcorn to a cookie sheet, and bake for 15 minutes. Cool for just a few minutes before serving.

Chomp! Enjoy :)

Green Chili Enchilada Bake

Ok, right off I have to tell you I struggled for several minutes deciding what to call this recipe. Green Chile Enchilada Bake is the name the recipe came with, and I only made one major substitution. It is pretty much the recipe I enjoyed a few weeks ago when my Shirl-girl made it during our awesome scrap-a-way weekend.

So, Jules, what’s the problem?

First off, it’s not green, despite the large volume of green ingredients. That in itself gives me pause. I would hate tobe known as a blogger who shares recipes with misleading titles. It’s bad enough that I’m a bacon-pusher, right? 

Second, you would think chilis were the Main Event here, but they’re not. There are very few peppers in it, period. I sprinkled a few across the top for color, and there is some jalapeno in the taco sauce. But, that’s it. Doesn’t seem right that my favorite fowl isn’t even mentioned until the ingredient list. Which leads me to my final issue…

This recipe in no way resembles anything I have ever eaten called an enchilada. Many thanks to the wellspring of information available to me on Wikipedia, I know that an enchilada is a rolled tortilla. The tortillas here, however, are torn to bits. An enchilada surrounds meat and/or cheeses. In fact, these tortilla bits are surrounded by everything else.

Do you see my dilemma? And, yet, the title stands and I won’t worry another minute about it. Why? Because this recipe has got legs. It’s creamy, a little spicy, and so deliciously filling. Three-fifths of the family loved it, and I can bring the other two around by using a less spicy salsa next time. Oh yes, there will be a next time.

Green Chili Enchilada Bake
adapted from The Picky Palate
Serves 6-8

1 cup mild green taco sauce (like Ortega)
1 cup light sour cream
1 cup salsa verde, mild
12 white corn tortillas torn into 1 inch pieces
2 cups cooked chicken (use fresh, or Perdue Short Cuts)
One 15 ounce can black beans, rinsed and drained
1 cup shredded Mexican blend cheese
1/4 cup each diced green and red pepper

Preheat oven to 350 degrees F

In a large bowl, combine taco sauce, sour cream, and salsa until well blended. Add tortilla pieces, chicken, and black beans and stir to combine. Pour into a 9×13 pan treated with pan spray. Sprinkle cheese and then peppers on top. Bake, uncovered, in oven for 25 minutes, or until cheese is melted and mixture is hot. Ole!

Enjoy!

Mad Muffin Mania! Lemon Blueberry Muffins

Pucker up and get ready for the best-tasting, most tender muffins you’ve ever had! These little morsels of lemony goodness were unbelievably good, and I was amazed at how tender they were – almost like a cupcake! And the lemonade-like glaze over the tops was the perfect finish.

I started with a recipe I found on the internet, then doctored it up to decrease the fat and increase the fiber. This is the first time I’ve made muffins with butter and yogurt instead of oil and milk, but it certainly won’t be my last! So, so good. And how psyched was I to used up more of that huge vat of plain yogurt we bought by mistake? As cute as she is, there are only so many times I’m going to let Georgia smear it all over my face for a “spa facial” a la Fancy Nancy :)

Love lemon? These are definitely for you. The whole family loved these, minus one dissenter, who just couldn’t handle the tangy sweetness. But, truth be told, he’s not a morning person and wasn’t thrilled to be pulled out of bed for muffins (or MCAS, or the whole getting-ready-for-school business). Sour puss :)

Lemon Blueberry Muffins
adapted from Allrecipes.com
Makes 12 muffins

1 cup all-purpose flour
3/4 cup whole wheat flour
3/4 cup sugar
1 tablespoon grated lemon peel
1 teaspoon baking powder
3/4 teaspoon baking soda
1/4 teaspoon salt
1 egg
1 cup plain lowfat yogurt
5 tablespoons butter, melted
1 tablespoon lemon juice
3/4 cup blueberries

Glaze:
1/3 cup lemon juice
1/4 cup sugar
1 teaspoon grated lemon peel

Preheat oven to 400 degrees F. Prepare muffin tin with a coating of spray oil.

In a large bowl, combine first 7 ingredients (flours through salt). In separate bowl beat the egg, then stir in yogurt, butter and lemon juice. Pour wet ingredients all at once into dry, and stir just until everything is moistened. (if necessary, add 1-2 tablespoons of milk if the dry ingredients don’t seem to be completely moistened). fold in blueberries carefully with spatula.

Spoon batter into muffin pan, filling each opening about 2/3 full. Bake for 20-22 minutes. Tops will be golden and will spring back when touched.

While muffins are in the oven, combine the glaze ingredients in small sauce pan, and cook over medium-low heat until sugar is dissolved. Once the muffins are out of the oven, cool for 5 minutes, then remove to a platter or a cooling rack on top of a cookie sheet (to catch the dripping glaze). Pour the glaze over the warm muffins liberally.

ENJOY!

Buffalo BBQ Chicken with Mango and Bleu Cheese

What. A. Day.  In my thirties, it was fun to be all round and glowing and have someone ask, “Are you expecting?” Let me tell you, when you are 44 and ABSOLUTELY AND TOTALLY NOT PREGNANT it is an entirely other feeling altogether. To make matters worse, I was asked this question by TWO different people, in two different zip codes, two hours apart. Sure, one of them was my own adorable girl and she is as fresh as a monkey and is totally jonesing for a baby sister. But the other was an actual adult with good manners and [so I thought] excellent eyesight. Seriously, what is going on? Did I step into some unkind lighting? Am I slouching? Is this outfit too clingy? Is my fiber-filled diet filling me with air? OMG somebody pop me.

What do you do when that happens? Run to the scale? No. Okay – yes, but only because I was truly curious if it would somehow show me a sudden 10 pound weight gain that I can neither see nor feel (it didn’t).  Punish myself with a brutal workout? Nope. Go on a diet? Puh-leeze, no thank you. 

I’m going to keep doing what I do every single day because it’s good for my body. I’ll eat a healthy, whole grain breakfast cuz I know it’s important to fuel up after 10-12 hours of fasting overnight. I’ll move my muscles and break a sweat because it’s great for me mentally and physically. I’ll take care of the million things I need to do tomorrow with barely a fleeting thought of whether my body is “OK.” And, most importantly, for lunch I will be enjoying this awesome concoction below because it was easy to make, fun to build, and an adventure to eat :)

This buffalo twist on my usual BBQ shredded chicken was inspired by the gals at hungry cupcakes. Their buffalo chicken sammies looked AMAZING. But, I couldn’t very well dump a whole bottle of hot sauce into a recipe meant for this family. I would have a food mutiny (a footiny, if you will) on my hands! So, I made my basic BBQ sauce, then started adding the hot sauce bit by bit until it seemed just mildly spicy. You can definitely double what I did here — if you dare. As is, this is a sweet/spicy combo yet mild enough that the kids enjoyed it.  The mango and bleu cheese were great compliments to the kick, and the red onion added great crunchy texture and flavor.

I can’t wait to eat it for lunch (again) tomorrow! Right after I make a trip to Goodwill with that outfit…

Buffalo BBQ Chicken with Mango, Red Onion, and Bleu Cheese
Serves 6

2 pounds chicken tenders
1 and 1/2 cups ketchup
1 and 1/2 tablespoons EACH of soy sauce, Worcestershire, and cider vinegar
2 teaspoons garlic powder
3 tablespoons brown sugar
2 tablespoons hot sauce (I used Frank’s Chile ‘n Lime)
1 ripe mango, peeled and sliced
1/2 red onion, sliced
Bleu cheese crumbles
Whole grain tortillas, like Joseph’s

Put chicken tenders into crock pot. In a medium bowl, whisk together the ketchup, soy sauce, Worcestershire, vinegar, garlic, brown sugar, and hot sauce. Adjust seasoning as desired. Pour sauce over the chicken. Cover and cook on low 6-7 hours. Remove chicken pieces to a cutting board and shred with two forks. Return the shredded chicken to the pot and stir to cover with sauce.

To build the perfect sandwich:

Start with a layer of greens (to prevent the sauce from soaking through — I forgot this part!)
Add 1/2 cup of chicken
Layer with red onions
Add 2-3 mango slices
Sprinkle with bleu cheese crumbles
Drizzle with additional hot sauce if desired

Eat as a tostada (i.e., with a fork and knife) or roll it up and snarf it down! it would also be delish on one of my fave Flatout breads. So, so good — is it tomorrow yet? ;)

News Flash: Diet Soda is not a Health Food

Does that come as a surprise to anybody? I sure hope not.  As a fairly regular imbiber of the stuff (both Tab and fountain diet Coke are my favorite caffeine-delivery vehicles), though, I was a bit alarmed at the sudden frequency of eyebrow-raising headlines, tweets, and Facebook posts I was seeing in the past few weeks.

 ”Can diet soda make you fat?” 
“Diet soda too dangerous to drink every day?”
“Diet sodas may not be much better than their sugar-filled counterparts.”

Could this be? Is diet soda defying the basic laws of food thermogenics? Probably not, at least not when you look deeper into the research. As with most headlines, what you see in large, bold-faced type is not the whole story. But what was prompting a sudden burst of alarming headlines about diet sodas being linked to stroke, heart attack, and weight gain?  

These headlines are not new.  There has been ongoing research looking for an association between diet soda and health for years. Last February 2011, fear abounded when a new study proclaimed “Diet Soft Drink Consumption Associated with an Increased Risk of Vascular Events in the Northern Manhattan Study.”  This small study revealed a significant increase in risk of  stroke or heart attack for two-a-day diet soda drinkers, when compared to non-soda drinkers. YIKES. But news outlets like Good Morning America and Forbes were quick to quell fears by pointing out the weak study design, and summarized that the research was at best, preliminary.  More and better research is needed before any concrete associations can be made.

Then, in June 2011, a much stronger study was published looking at the association between diet soda intake and waist circumference (a sign of abdominal obesity) in adults. The results were alarming: compared to non-drinkers, diet soda drinkers had a 70% increase in waist circumference over 10 years, and two-a-day drinkers had a 500% increase in waist circumference.  The researchers were careful to control for confounding factors like smoking, physical activity, age, and education level. Unfortunately, they did not appear to control for dietary quality — surely one of the primary factors in weight change. 

Finally, in April 2012, there was a study published that looked at the relationship between diet soda consumption and health outcomes like weight, blood pressure, and metabolic syndrome (a nasty combination of increased belly fat, high blood sugars and triglycerides, low HDL cholesterol, and high blood pressure, all working in concert to increase your chance of heart attack and stroke).

Wisely, they didn’t look at just diet soda intake. They also looked at quality of diet. Brilliant, right? They categorized people based on whether they followed a ”prudent” diet (rich in fish, whole grains, fruit, veggies, and dairy) or a more “Western” diet (higher in fast food, meat, poultry, pizza, and snacks). Not surprisingly, the healthiest people in the study were those who followed a prudent diet and drank no soda at all.  However, the second healthiest group were people who followed a prudent diet and drank diet soda. Both these groups had lower risks of developing metabolic syndrome, high blood pressure, or high triglycerides. Who were the least healthy people in the study? A no-brainer: those who followed a Western diet had an increased risk of heart disease, whether or not they drank diet soda.

So, what’s the moral of this story? Diet soda is not a health food, but neither does the body of research support its banishment from the planet. It can be a savior for those looking for a simple, painless way to decrease calories in their diet.  But, is it a NEUTRAL component of your diet? Maybe not. The research is still developing. Questions abound on whether artificial sweeteners induce cravings for sweets and other carbohydrates. There’s also the potential for a psychological effect — that old joke about the super-sized diet soda canceling out the calories in the triple cheeseburger and large fries :) Are folks justifying the intake of less healthy foods when they are consuming a diet beverage?  Now THAT would be an interesting study!

For today, I think it’s safe to say that the story on healthy eating has not changed. A diet rich in lean, high quality protein, fruits, vegetables, nuts, and low-fat dairy is still the way to go to ensure good health.  Diet soda in moderate amounts (i.e., a few times a week) is unlikely to have a negative impact in the context of this healthy diet. I certainly wouldn’t add it to your diet if you have survived this long without it. Water is still the best choice for keeping your body hydrated.  Tap, bottled, seltzer – however you like it.

Does any of this apply to kids? No! I do not believe that soda of any kind deserves a place in the everyday (or even everyweek) diets of kids. Their beverage priorities are low-fat dairy and water. Period. A small portion of juice can be a good source of Vitamin C,  but, nutritionally speaking, it pales in comparison to the whole fruits from which it came. In our house, the kids enjoy soda (or some other sugary beverage) once or twice a month, when we make pizza or have a cookout. They drink low-fat milk throughout the day (we go through 6 gallons a week), water for sporting events, and occasionally Gatorade when the weather calls for it.  Since this is how it has always been, it hasn’t been as hard as you might think to stick with these expectations as they have gotten older and more independent.

Whew! That was exhausting, putting that all out there! Please, let’s get back to plain ol’ recipes tomorrow :) In the meantime, I welcome your comments on the diet soda controversy as well as your take on the role of soda in the diets of your kids.

Have a wonderful day!

Julie

Chicken Sausage and Sweet Potato Frittata

Need another quick and easy dinner idea?  I made this frittata yesterday in about 20 minutes. Might just be my new go-to meal for these crazed weeknights!

What’s a frittata, you ask? Now, don’t be scared. Frittata is just a fancy word for omelet. If that doesn’t ease your mind (for all I know, you had some unbelievable omelet-related flooper in your past from which you are still recovering), then please know that frittata is just a fancy word for a SIMPLER OPEN-FACED omelet. Bottom line? There is no folding or flipping required. All you need is a large oven-safe pan, eggs and your choice of other stuff, and you are good to go!

Here’s what I love about the frittata — it serves multiple people. With an omelet, you typically make one per person. Time-consuming and very hands-on. Not so with the frittata! Finish cooking it, cut it into wedges, and dinner is served.

A beauty, ain’t it? Yummy, too. We all loved/liked it to varying degrees, and there wasn’t a crumb left. Try it and let me know what you think!

Chicken Sausage and Sweet Potato Frittata
Serves 4

2 chicken sausages, cut into bite-sized pieces
1/2 purple onion, chopped
1/2 green pepper, chopped
1 small sweet potato, peeled and cubed small
1 1/2 tablespoons olive oil
5 eggs plus 2 egg whites
1/4 cup non-fat milk
1/3 cup shredded cheddar

1) Over medium-high heat, add olive oil to a large, oven-safe pan. Add sausage, onion, pepper, and sweet potato and cook, stirring occasionally, until potatoes are softened (about 8-10 minutes).

2) While mixture is cooking, combine eggs, egg whites and milk in a bowl and whisk together. Once potatoes have softened, add egg mixture to pan, reduce heat to medium-low, and cook until bottom layer is set, about 3-4 minutes. While it is cooking, push the cooked edges towards the center a bit with a spatula to allow the uncooked egg to move toward the sides.
3) Turn on the oven broiler. Remove pan from stove (center of frittata will still be runny) and put under broiler for 3-5 minutes, watching to be sure it does not over-brown.

4) Remove, sprinkle cheddar cheese around, and return to broiler for one more minute.
5) Cut frittata in 4-6 wedges. Serve with side salad or other greens.

Enjoy!

Crockpot Chicken Tacos

It is the second week of May and if it weren’t for my iPhone calendar, I wouldn’t know what day it is. We are in the throes of baseball, soccer, school concerts, karate testing, and gymnastics; this piled on top of the everyday business of  jobs, school, sleep, chores, and family time. And meals! Don’t forget the need to eat 3 or 4 times a day. I keep asking myself, “How did we get here?” I never wanted to be that crazed, over-scheduled family — the parents harried and jacked on caffeine, auto-piloting from one activity to the next, one foot plodding after the other until they crash into bed late at night.  I saw it so many times in the eyes of my friends and smugly thought, “Not us.”

And, yet, here we are. We held off as long as we could. How do we say ‘no’ to kids who are full of enthusiasm and energy and want to do everything? They want to play baseball. They want to play soccer. [Does it have to be all in the same season? Apparently so. I was begging them to just pick one, but caved big-time to the testosterone lobby in my house.] And so, we spend 3-4 nights a week at baseball, a few times a week at soccer, and squeeze in karate when we can. What’s a mom to do? They are good kids, they do well in school, and live in a household devoid of the usual comforts like cable TV and an Xbox. We’re not complete ogres, so we say yes to these interests. And try to maintain some sense of order amidst the chaos. 

Good nutrition often takes a hit. One day last week I realized none of the kids had more than 2 servings of fruit or vegetables the entire day. Argggh!  How do you keep the family fueled up when you are on the run all day, then again from 4:00 to 7:00 pm? Three things I know that help:  planning, smart snacking, and a stocked pantry. This crockpot chicken taco recipe is a good example of quick and easy meal you can plan to do ahead, with ingredients you are likely to have on hand. Throw it in the crockpot in the morning, and whenever you happen to get back, it will be ready. More ideas for feeding the on-the-go family coming in my next post.

Crockpot Chicken Tacos
Recipe courtesy of the fantastic Barbara Duff
Serves 6-8

2 1-lb packages of boneless chicken tenders
15 ounces lower-sodium chicken broth (like College Inn)
12 ounces salsa
1 package of lower-sodium taco seasoning (like Old El Paso)

Add all ingredients to crockpot. Cover and cook on Low for 6-8 hours. Remove chicken to cutting board and shred with two forks. Return shredded meat to crockpot and stir to combine with sauce. Serve on soft or crunchy tortilla with avocado, chopped onion, tomatoes, light sour cream, hot sauce, shredded cheddar, taco sauce, etc…

Building your own taco is light creating a work of art. Georgia made me promise I would include the taco she built as well :)

That’s all for now, but I leave you with this question: what is your favorite healthy go-to snack for yourself or the kids when you’ve got a chaotic afternoon ahead? Let me know and I’ll include them in the next post!

Rosemary and Thyme Roasted Potatoes

I’ve had a lifelong love affair with potato chips. No amount of schooling in nutrition, knowledge of nutrition facts labels, or well-meaning input from health-conscious friends can deter me from my love. That’s not to say I eat them frequently – a few times a month, maybe. But, I do love ‘em. “What??” you say? “A dietitian that loves potato chips?” Perhaps you missed my very public confession.  But, hey, don’t knock the chip!  If you’re gonna eat “junk,” potato chips aren’t a terrible choice.  Think about it: the best kinds only have 3 ingredients – potatoes, oil, and salt. And you can actually pronounce each ingredient without a PhD in biochemistry ;)

That said, I do believe roasted potatoes are my most favorite way to eat spuds.  In the past, I often have taken the lazy route and made them with Lipton Onion Soup mix. Talk about complicated ingredients! I was fresh out of  Lipton, not to mention the many ingredients that go into it, such as hydrolyzed soy protein, caramel color, monosodium glutamate, disodium inosinate, and disodium guanylate.  Holy sodium! So, I threw together a new version, and am happy to report it was seriously delicious. The house was filled with an incredible aroma, and they turned crispy and golden, just the way I like them! They were the perfect addition to the oven-fried haddock I made for my mum’s birthday dinner, and were a hit with everybody, even the youngest, who actually had seconds!

If you’re looking for a yummy new way to dress up your typical spuds, try it!

Rosemary and Thyme Roasted Potatoes 
Serves 6-8

6 baking potatoes, peeled and cut into 1-inch cubes
3 tablespoons olive oil
1 tablespoon melted butter
3/4 teaspoon ground thyme
1 – 1/2 teaspoons rosemary
2 teaspoons chopped garlic
salt and pepper to taste

Preheat oven to 425 degree F

Combine all ingredients in large bowl and mix until all potato pieces are well-coated with oil and seasonings. Spread out onto a cookie sheet (the kind with sides) and roast for approximately 40 minutes. Half way through cooking, give them a good turn to prevent sticking.

Enjoy!

Hall of Fame Pigs

What a busy weekend!! I’ve never been more happy to see Monday. There was a baseball game, kitchen creations, bell choir rehearsal, church, and even a flash mob at the Hatch Shell. But the absolute highlight was to see my kid sister inducted into North Reading’s Hornet Hall of Fame. She was an incredible athlete in every sport she played, and opponents knew exactly who she was. On the tennis court, she was the girl you knew never to try to drop-shot, because she could get anywhere on the court in a split second. During a volleyball match, you knew her for her bullet serves, and prayed one of them wouldn’t come your way. On the basketball court, she was the one that was lightening fast and a great passer, so you crossed your fingers hoping you wouldn’t be the one stuck guarding her.

Where’d she get all this talent? Genetics? Sure. Tremendous athleticism honed by
years of ballet, tap and jazz? Absolutely. Birth order? For sure! Come on, with three older siblings, you can bet she got plenty of ‘training’ at home. There was the speed work: “Jen, get me a drink of water? I’ll time you. GO!”  There was intense defensive training during four-square, where big bro’ would whip the ball at her again and again, ultimately forcing her to figure out how to play it, or be an easy out.  And, of course, toughness training: “You’re not gonna cry are you? Nope, don’t do it. Don’t be a baby!” I tell you, it’s not easy being the youngest. Just ask Jen.

On her Big Night, what do you get the girl who already has everything and is the most generous gift-giver there is? I knew it had to be something that totally represented her. Then, I saw a great idea in a cookie magazine I had picked up in the checkout line (an impulse buy, so unlike me, but clearly fate). As soon as I saw recipe, I just knew I was making them, and who I was making them for. Pig cookies! My sister loves pigs. And cookies. (How was I to know she was on some strict low-carb diet?? Ah, well.)

Anyhow, aren’t they adorable? Delicious, too, as many friends at the induction ceremony confirmed. Tender, cakey cookies, vanilla frosting, and chocolate and butterscotch chips. And, me and kiddos had so much fun making them. Really, you can’t go wrong!

Here they are, waving their green-and-gold Hornet colors proudly!

Congratulations to my sister, athlete extraordinaire!! Here, have a cookie :)

Hall of Fame Pig Cookies
From Taste of Home
Makes about 4 dozen cookies

COOKIE BATTER:
1 cup butter, softened
1-1/2 cups sugar
2 eggs
1 cup lowfat sour cream
1 teaspoon vanilla extract
3 cups all-purpose flour
1 teaspoon baking powder
1/2 teaspoon salt

FROSTING/DECORATING:
4 cups confectioner’s sugar
1/2 cup butter, melted
6 tablespoons milk
2 teaspoons vanilla extract
3-4 drops red food coloring
Pink sugar wafer cookies
Large marshmallows, halved
Butterscotch chips and miniature semisweet chocolate chips

Preheat oven to 375 degree

1) In a large bowl, cream butter and sugar until light and fluffy. Beat in the eggs, sour cream and vanilla. Combine dry ingredients; gradually add to creamed mixture and mix well.

2) Drop batter by tablespoonfuls onto ungreased baking sheets. Bake for 10-12 minutes, or until edges are lightly browned. Remove to wire racks to cool completely.

3) Frosting: in a large bowl, combine the confectioner’s sugar, butter, milk, vanilla, and food coloring and mix until all are combined and frosting is uniformly pink. Frost each cookie top, all the way to the edges.

4) Cut sugar wafers into triangles; place two on each cookie for ears. With a toothpick, poke two holes in each marshmallow half, and press a butterscotch chip into each hole for nostrils. Place the noses on the cookies, and add miniature chocolate chip eyes.

OINK!

Previous Older Entries

Follow

Get every new post delivered to your Inbox.

Join 144 other followers